Creating Custom Libraries
Libraries are a convenient location to store blocks that are (or are likely to be) used several times in a model or used in several models.
This tutorial discusses the steps involved in creating a library, and some of the features of a library that make it different from a standard model.
The tutorial is split into the following sections,
- Creating a Custom Library.
- Using a Custom Library.
- Adding a Custom Library to the Library Browser.
- Features of a Library.
Other tutorials discussing Simulink and its applications for model based design are available on the Software Tutorials page.
Creating a Custom Library
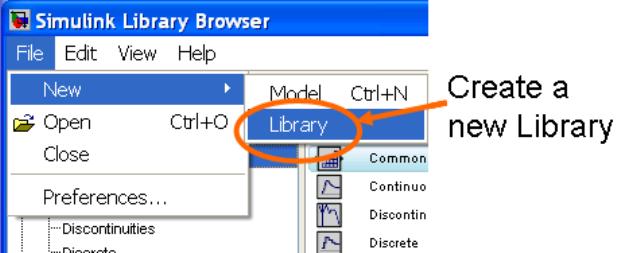
Libraries are created in a very similar way to a standard model. The first step is to use the Library Browser’s File→New→Library pull-down menu to open a new library. (See Figure 1).

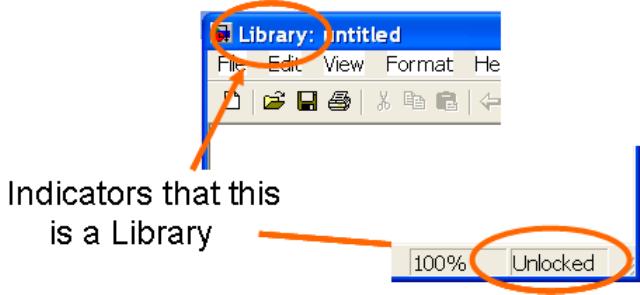
As shown in Figure 2, there are several indicators that a library is being created (as opposed the a standard model). Firstly in the top left corner, where the name of the library appears, the word Library is prepended. And secondly in the lower right hand corner the work Unlocked is written. (The implications of a Locked and Unlocked library are discussed in the section Features of a Library.)

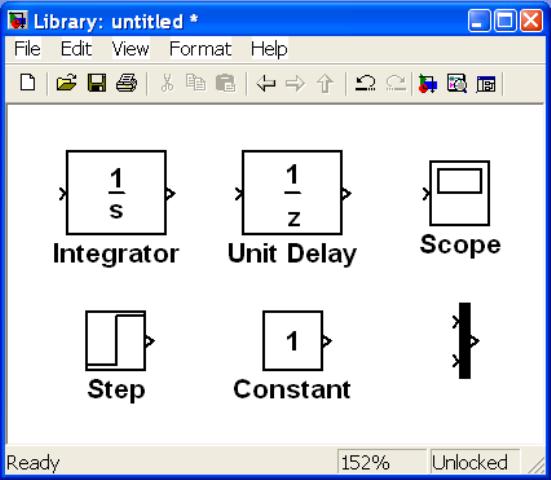
Once a new library has been opened, blocks may be added to it in the same (drag and drop) way as blocks are added to a model. However, blocks within a library are typically not connected by signals. Figure 3 shows an example library where blocks from the standard Simulink libraries have been placed in the new library. (In this tutorial blocks from the standard Simulink libraries have been used for convenience. More typically custom blocks are added to a custom library.)

Once the required blocks have been added to the new library it should be closed. This has the effect of locking the library. (The implications of a locked and unlocked library are discussed in the section Features of a Library.)
Using a Custom Library
A custom library is used in an identical way to using any other library. The library needs to be opened to use it. This is achieved in the same way as for a model -- see Opening a New or Existing Model within the Model Building with Simulink tutorial. Once opened, blocks are dragged from a library and placed into a model in the usual way.
Adding a Custom Library to the Library Browser
The Library Broswer is a convenient tool for grouping all available libraries, hence when a custom library is created the developer will usually want to add it to the Library Browser.
Adding a library to the Library Browser is achieved by writing a MATLAB function called slblocks (in a file called slblocks.m). The function slblocks must have a specific format, and slblock.m must be in a directory that is on the MATLAB path.
function blkStruct = slblocks
% Function to add a specific custom library to the Library Browser

% Author: Phil Goddard (phil@goddardconsulting.ca)

% Define how the custom library is displayed in the Library Browser
Browser.Library = 'customlib'; % Name of the .mdl file
Browser.Name    = 'My Custom Library';
Browser.IsFlat  = 1; % Is this library "flat" (i.e. no subsystems)?

% Define how the custom library is displayed in the older style
% "Blocksets and Toolboxes" view.
blkStruct.Name = ['My Custom' sprintf('\n') 'Library'];
blkStruct.OpenFcn = 'customlib'; % Name of the .mdl file
blkStruct.MaskDisplay = '';

% Output the required structure
blkStruct.Browser = Browser;
Figure 4 gives an example slblocks function. It assumes that the library has been saved in a file called customlib.mdl. There are two somewhat distinct parts to slblocks: the first part specifies what is displayed in the Library Browser; and the second part specifies what is displayed when the library is viewed in an older style Blocksets and Toolboxes view. (The Blocksets and Toolboxes view is rarely used but is included for completeness.)
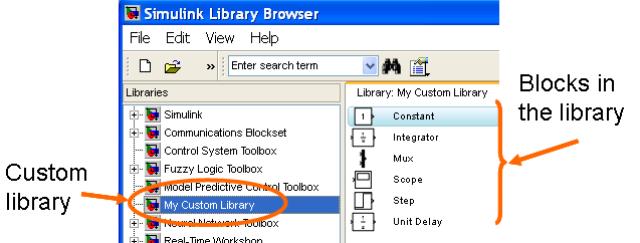
Once slbocks.m has been written it must be saved, and then the Library Browser must be closed and restarted, for the custom library to be seen in the browser. Figure 5 shows the Library Browser after this has been done, with the custom library being displayed.

One slblocks function can add multiple libraries to the Library Browser. For an example of this, and a more detailed description of the code syntax used by slblocks, look at the file that controls how the main Simulink library is displayed in the Library Browser. The following code shows how to do this from the MATLAB command prompt
>> edit([matlabroot,'\toolbox\simulink\blocks\slblocks.m']);
Features of a Library
Although libraries have a very similar look and feel to a model they do have some distinct features. These include,
- Libraries do not get simulated.
- A library is by default locked. This means that it cannot be unknowingly changed/altered by a user -- the user must specifically tell Simulink that they know they are making a change. This protects library blocks from mindless or accidental tampering. (When a user tries to make a change to a locked library they receive a message asking them if they want to unlock the library or if they want to discard the changes they are trying to make.)
- When used in a model a block taken from a library is linked back to the library. This means that all instances of the block used in all models are guaranteed to have exactly the same implementation. In terms of topology they are in fact exactly the same block. Note that each instance of the block may have different parameters. A significant advantage of being linked is that changes made to the library block will propogate to all instance of the block in all models that use the block.
This tutorial has discussed topics related to creating and using custom libraries. Other Simulink tutorials are available on the Software Tutorials page.